I thought this paper was great when I picked it out at Michaels. I was there looking for paper for Father's Day cards and came across this decorative paper by Creative Imaginations.
The sheet has a bunch of different comic panels with various phrases. I choose the ones you see on the card. The sheet is black and white and is vary retro 50's. I added some color so the panels using a red marker and outlined the panels and the phrases in black.
Each panel is layered on brown cardstock and machine stitched. The phrases were attached to the card using mounting tape to give it a 3-D effect. The base and inside of the card is layered in cream and brown. The panel edges have been sponged with black and brown stamping ink.
Materials Used
Funny Pages from Creative Imaginations
Cream and Brown Cardstock from Bazzill Basics
Machine Stitching
Brown and Black Stamp Pad
Red and Black Markers
Friday, July 9, 2010
Ode to Charlotte York Goldenblatt
Did I tell you how much I love my Cricut. Ok...I love my Cricut.
I made the base of this card about a month ago. I like the color combination of pink and brown. I didn't know what I was going to add to the front of the card, but when my Forever Young Cricut cartridge arrived and I opened it up, the little light-bulb flickered. I love all of the images on the cartridge, but found this purse to be the perfect fit for my card. Once assembled, it screamed Charlotte York Goldenblatt from Sex and the City. I like all the gals in SNTC and will probably create a card representing each of the ladies at some point in time.
The card is layered in Vintage Pink and brown (sorry, didn't write down the the exact color name) for the brown cardstock from Bazzill Basics and this cool decorative geometrical design cardstock from Jolie's Chocolat. The pad is awesome and have created a bunch of cards using the decorative paper. I highly recommend purchasing it if you get a chance. I machine stitched the decorative paper to the card using brown thread. I purposely created the stitching with a few waves to add a little dimension to the overall feel of the card. The inside of the card is also layered in browns and pink.
Now for the purse and accessories....I used a different sheet from the Chocolat pad for the outside of the purse and layered the same decorative sheet used for the main frame of the card for the lining of the purse. I added some beads to the purse for a decorative feel. Of course no purse is complete without accessories. I cut out gloves, lipstick, and a mirror using pink, brown and gold cardstock. For the mirror, I used silver cardstock for the mirror and gold cardstock for the handle. I also embellshed each accesory with beads and added some gold and brown stamping ink to the edges. I cut out several layers for each of the accessories to give them some thickness. All the accessories have been attached to the purse with glue dots. The purse is attached to the card with glue dots.
Materials Used
Acid Free Cream Cardstock
Decorative Paper from Chocolat Jolie Paper Pad
Pink and Brown Cardstock from Bazzill Basics
Beads
Machine Stitching
Gold & Brown Stamping Pad
Thursday, July 8, 2010
Vintage Inspired Jeweled Blank Handmade Card
I made this card a few months ago using some this great heavy decorative paper from the Chocolat Jolie Paper Pad. I wanted to do a little something with panels and came up with this design. Not really complex but think it came out fairly well.
I layered the white card stock card with pink cardstock (from the Jolie pad) and then worked on layering the panels. The top two panels and the bottom panel are 3 layers (brown cardstock, decorative brown cardstock, and a embossed decorative pink cardstock) all from the Chocolat Jolie Paper Pad.
I had these old antique looking jewels (top two panels) that I picked up at a garage sale sometime in the past few years. I knew they would be great for a card but didn't have any idea what exactly I would do with them. The larger shell-shaped jewel is from an earring I wore when I was in middle school (yes, 1980's). The top two jewels are attached using wire and the large jewel is attached with a gold brad.
Materials Used
Acid Free White Cardstock
Decorative Paper from Chocolat Jolie Paper Pad
Materials Used
Acid Free White Cardstock
Decorative Paper from Chocolat Jolie Paper Pad
Jewels
Wire and Brads
Quilled Baby Congratulations Handmade Cards
I have made two quilled Baby Congratulations cards for my friend Crystal. All she told me was that she needed a congratulations card and for whatever reason, I decided that they both needed to be quilled.
The first one I made was for one of her friends that lives in Hawaii. So, I went for a Hawaiian theme. I had this light yellow and sage leaf embossed decorative paper that would be perfect for the card. I layered the decorative paper on light yellow cardstock and a light olive green card stock. I found the perfect design for the quilled baby carriage at Inna's Creations. I quilled some orange flowers to give it more of an island fell. The Ho'omaika'i 'Ana (Congratulations in Hawaiian) tag is printed, sponged with stamping ink and mounted to give the tag a 3D effect.
For the second card, she wanted me to do a navy theme. I was stumped. What the heck was I going to do. I decided a quilled stork carrying a baby would be ocean like and a quilled anchor would add the Navy touch. The card has several layers. First I machine stitched the navy blue cardstock on off-white cardstock. The second layer is dark blue with blue polka dots cardstock from the Fall/Halloween pad I purchased from Oriental Trading Company last year. The third layer is this decorative washed blue cardstock from It's Time Breaking Free Adventure Series by Jen Wilson.
The quilled anchor sits on two separate layers created using the polka dots cardstock and a decorative blue waves paper (Surf's Up) from My Mind's Eye by Zoe Pearn. The Congratulations tag is also layered using light blue cardstock and white cardstock that has been sponged with blue stamping ink.
I layered and machine stitched the inside of the card to match the front. And there you go....many hours later...the card is complete and ready to send.
Materials Used For the Hawaiian Themed Baby Congratulations Card
Acid Free White Cardstock
Yellow and Olive Green Cardstock
Light Yellow and Sage Leaf Embossed Decorative Paper
Acid Free White Cardstock
Yellow and Olive Green Cardstock
Light Yellow and Sage Leaf Embossed Decorative Paper
Quilling Paper
Yellow and Light Green Stamping Pad
Materials Used For the Anchor's Away Baby Congratulations Card
Acid Free White Cardstock
Navy Blue Cardstock
Acid Free White Cardstock
Navy Blue Cardstock
Dark Blue Polk Dots Decorative Paper form Fall/Halloween Pad by Oriental Trading Company
Washed Blue Decorative Paper (It's Time) - Breaking Free Adventure Series by Jen Wilson
Blue Waves Decorative Paper (Surf's Up) - My Mind's Eye by Zoe Pearn
Quilling Paper
Machine Stitching
Blue Stamping Pad
Blue Stamping Pad
Saturday, July 3, 2010
Add Your Etsy Mini to Blogger
I found this great blogger at Simply Wired Custom Jewelery who has detailed how to add your Etsy Mini to your blog. Check out her site.
This tutorial covers adding an Etsy Mini to your blog. For this example, I'll be showing you how to add the Mini to one of your sidebar columns (rather than directly in a blog post). Since the sidebar content remains static regardless of what blog post a user chooses to view, I figured this would be the most commonly used option.
Alrighty...here we go (by the way, if the pics are hard to view, you can always click on them for a larger version):
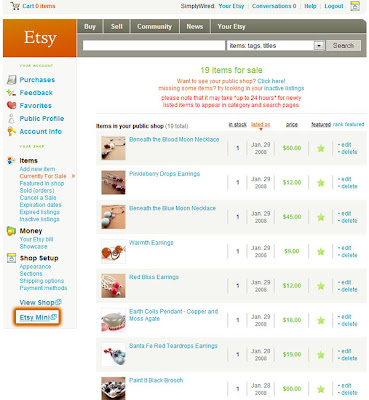
Step 1: From Your Etsy, click the Etsy Mini link, located at the bottom left of the screen (for this screen capture, I highlighted it for you so it would stick out better).
I'm going to post her 1st Step just for reference.
Add Your Etsy Mini to Blogger
This tutorial covers adding an Etsy Mini to your blog. For this example, I'll be showing you how to add the Mini to one of your sidebar columns (rather than directly in a blog post). Since the sidebar content remains static regardless of what blog post a user chooses to view, I figured this would be the most commonly used option.
Alrighty...here we go (by the way, if the pics are hard to view, you can always click on them for a larger version):
Step 1: From Your Etsy, click the Etsy Mini link, located at the bottom left of the screen (for this screen capture, I highlighted it for you so it would stick out better).
Subscribe to:
Posts (Atom)